April 14, 2024
4 min

Workspaces delivers new privacy controls and improved collaboration

Improved organization, privacy controls, and more with new Workspaces 🚀

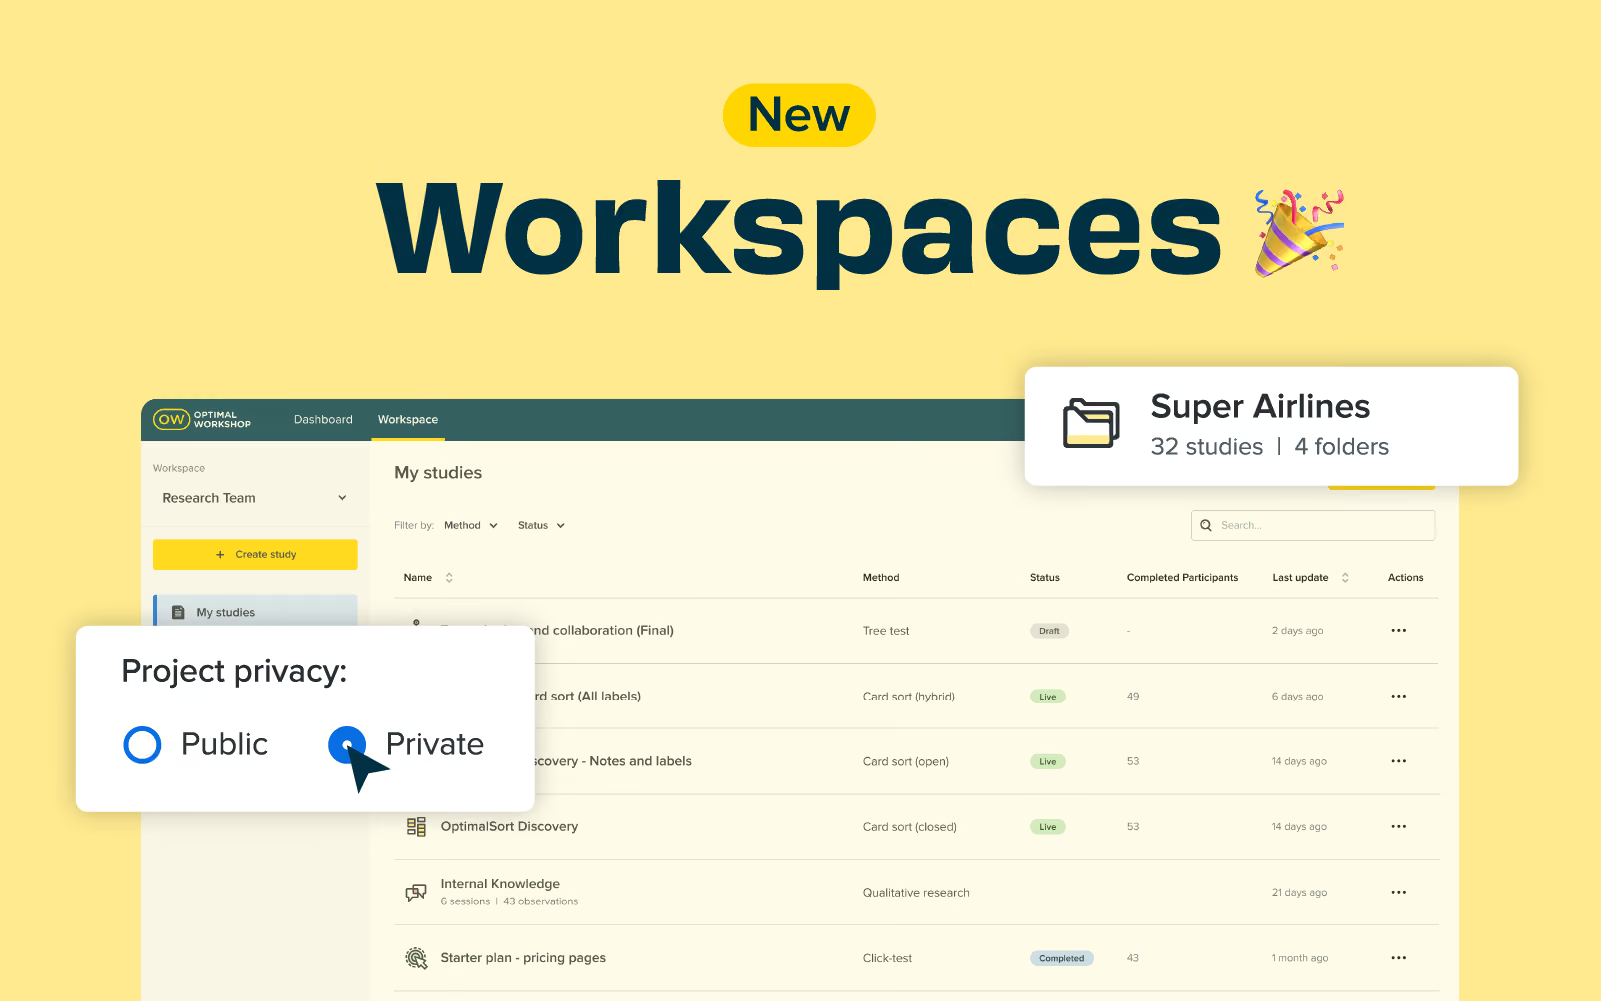
One of our key priorities in 2024 is making Optimal Workshop easier for large organizations to manage teams and collaborate more effectively on delivering optimal digital experiences. Workspaces is going live this week, which replaces teams, and introduces projects and folders for improved organization and privacy controls. Our latest release lays the foundations to provide more control over managing users, licenses, and user roles in the app in the near future.

More control with project privacy 🔒

Private projects allow greater flexibility on who can see what in your workspace, with the ability to make projects public or private and manage who can access a project. Find out more about how to set up private projects in this help article.

What changes for Enterprise customers? 😅

  • The teams you have set up today will remain the same; they are renamed workspaces.
  • Studies will be moved to a 'Default project' within the new workspace, from here you can decide how you would like to organize your studies and access to them.

  • You can create new projects, move studies into them, and use the new privacy features to control who has access to studies or leave them as public access.

  • Optimal Workshop are here to help if you would like to review your account structure and make changes, please reach out to your Customer Success Manager.

Watch the video 🎞️

What changes for Professional and Team customers? 😨

Customers on either a Professional or Team plan will notice the studies tab will now be called Workspace. We have introduced another layer of organization called projects, and there is a new-look sidebar on the left to create projects, folders, and studies.

What's next for Workspaces? 🔮

This new release is an essential step towards improving how we manage users, licenses, and different role types in Optimal Workshop. We hope to deliver more updates, such as the ability to move studies between workspaces, in the near future. If you have any feedback or ideas you want to share on workspaces or Optimal Workshop, please email product@optimalworkshop.com; we'd love to hear from you.

Share this article
Author
Sarah
Flutey

Related articles

View all blog articles
Learn more
1 min read

Ready for take-off: Best practices for creating and launching remote user research studies

"Hi Optimal Work,I was wondering if there are some best practices you stick to when creating or sending out different UX research studies (i.e. Card sorts, Prototyye Test studies, etc)? Thank you! Mary"

Indeed I do! Over the years I’ve learned a lot about creating remote research studies and engaging participants. That experience has taught me a lot about what works, what doesn’t and what leaves me refreshing my results screen eagerly anticipating participant responses and getting absolute zip. Here are my top tips for remote research study creation and launch success!

Creating remote research studies

Use screener questions and post-study questions wisely

Screener questions are really useful for eliminating participants who may not fit the criteria you’re looking for but you can’t exactly stop them from being less than truthful in their responses. Now, I’m not saying all participants lie on the screener so they can get to the activity (and potentially claim an incentive) but I am saying it’s something you can’t control. To help manage this, I like to use the post-study questions to provide additional context and structure to the research.

Depending on the study, I might ask questions to which the answers might confirm or exclude specific participants from a specific group. For example, if I’m doing research on people who live in a specific town or area, I’ll include a location based question after the study. Any participant who says they live somewhere else is getting excluded via that handy toggle option in the results section. Post-study questions are also great for capturing additional ideas and feedback after participants complete the activity as remote research limits your capacity to get those — you’re not there with them so you can’t just ask. Post-study questions can really help bridge this gap. Use no more than five post-study questions at a time and consider not making them compulsory.

Do a practice run

No matter how careful I am, I always miss something! A typo, a card with a label in the wrong case, forgetting to update a new version of an information architecture after a change was made — stupid mistakes that we all make. By launching a practice version of your study and sharing it with your team or client, you can stop those errors dead in their tracks. It’s also a great way to get feedback from the team on your work before the real deal goes live. If you find an error, all you have to do is duplicate the study, fix the error and then launch. Just keep an eye on the naming conventions used for your studies to prevent the practice version and the final version from getting mixed up!

Sending out remote research studies

Manage expectations about how long the study will be open for

Something that has come back to bite me more than once is failing to clearly explain when the study will close. Understandably, participants can be left feeling pretty annoyed when they mentally commit to complete a study only to find it’s no longer available. There does come a point when you need to shut the study down to accurately report on quantitative data and you’re not going to be able to prevent every instance of this, but providing that information upfront will go a long way.

Provide contact details and be open to questions

You may think you’re setting yourself up to be bombarded with emails, but I’ve found that isn’t necessarily the case. I’ve noticed I get around 1-3 participants contacting me per study. Sometimes they just want to tell me they completed it and potentially provide additional information and sometimes they have a question about the project itself. I’ve also found that sometimes they have something even more interesting to share such as the contact details of someone I may benefit from connecting with — or something else entirely! You never know what surprises they have up their sleeves and it’s important to be open to it. Providing an email address or social media contact details could open up a world of possibilities.

Don’t forget to include the link!

It might seem really obvious, but I can’t tell you how many emails I received (and have been guilty of sending out) that are missing the damn link to the study. It happens! You’re so focused on getting that delivery right and it becomes really easy to miss that final yet crucial piece of information.

To avoid this irritating mishap, I always complete a checklist before hitting send:

  • Have I checked my spelling and grammar?
  • Have I replaced all the template placeholder content with the correct information?
  • Have I mentioned when the study will close?
  • Have I included contact details?
  • Have I launched my study and received confirmation that it is live?
  • Have I included the link to the study in my communications to participants?
  • Does the link work? (yep, I’ve broken it before)

General tips for both creating and sending out remote research studies

Know your audience

First and foremost, before you create or disseminate a remote research study, you need to understand who it’s going to and how they best receive this type of content. Posting it out when none of your followers are in your user group may not be the best approach. Do a quick brainstorm about the best way to reach them. For example if your users are internal staff, there might be an internal communications channel such as an all-staff newsletter, intranet or social media site that you can share the link and approach content to.

Keep it brief

And by that I’m talking about both the engagement mechanism and the study itself. I learned this one the hard way. Time is everything and no matter your intentions, no one wants to spend more time than they have to. Even more so in situations where you’re unable to provide incentives (yep, I’ve been there). As a rule, I always stick to no more than 10 questions in a remote research study and for card sorts, I’ll never include more than 60 cards. Anything more than that will see a spike in abandonment rates and of course only serve to annoy and frustrate your participants. You need to ensure that you’re balancing your need to gain insights with their time constraints.

As for the accompanying approach content, short and snappy equals happy! In the case of an email, website, other social media post, newsletter, carrier pigeon etc, keep your approach spiel to no more than a paragraph. Use an audience appropriate tone and stick to the basics such as: a high level sentence on what you’re doing, roughly how long the study will take participants to complete, details of any incentives on offer and of course don’t forget to thank them.

Set clear instructions

The default instructions in Optimal Workshop’s suite of tools are really well designed and I’ve learned to borrow from them for my approach content when sending the link out. There’s no need for wheel reinvention and it usually just needs a slight tweak to suit the specific study. This also helps provide participants with a consistent experience and minimizes confusion allowing them to focus on sharing those valuable insights!

Create a template

When you’re on to something that works — turn it into a template! Every time I create a study or send one out, I save it for future use. It still needs minor tweaks each time, but I use them to iterate my template.What are your top tips for creating and sending out remote user research studies? Comment below!

Learn more
1 min read

Product Roadmap Update 2024 🛣️ 🎉

We’re excited to announce the latest updates to our platform to help teams test, validate and gain insights early in the design process. Looking ahead to the rest of 2024, stay tuned as we expand Optimal’s research capabilities with new tools and features, including Prototype Testing, Qualitative Insights, and upgraded Surveys along with enhanced admin management and user roles!

What’s new at Optimal? 🤩

Managed Recruitment 🙋🙋🏾


We’re thrilled to share the launch of our new Managed Recruitment offering with high quality and expanded profiling capabilities for hard-to-reach audiences. Managed Recruitment leverages our in-house recruitment team and a new powerful, award-winning panel — PureSpectrum — to give you access to millions of participants across 100+ countries. Optimal handles recruitment logistics from start to finish, guaranteeing quality responses and replacing low-quality participants at no extra cost.

Early access is now available. To get started, submit your criteria via the request form. Starting in early August, you’ll be able to access Managed Recruitment via the Optimal Recruit tab. Recruitment is available for all Optimal tools except for Qualitative Insights (Reframer).

What’s coming next? 🔮🧙

Test your designs early and often with our latest tool:  Prototype Testing ⚙️

The newest edition to the Optimal toolkit is just around the corner.  Prototype testing will allow you to quickly  test designs with users throughout the design process, to help inform decisions so you can build on with confidence.


You’ll have the option to easily import low or high-fidelity prototypes directly from Figma or build your own prototypes from scratch  by uploading images or screenshots and creating clickable areas. Prototype testing allows you to Identify usability issues and areas for improvement throughout the design process to iterate and improve your designs quickly with your users.

Video Recording 🎬📽️🎞️

After we launch Prototype testing, we’ll be adding Video Recording to allow you to record a participant completing a prototype test. You can capture nonverbal cues like eye rolls and frustration, screens and voices to better understand user experiences, and gain deeper insights for Prototype Testing. Video recording is browser-based, with no plug in required eliminating setup complexities. Consent to record is captured upfront in the testing process and can be tailored to meet your organization’s policies.

Qualitative Insights & AI 🤖✨

You’ll be able to capture meaningful insights faster and more efficiently with the new Insights feature under our Qualitative Insights (Reframer) tool. Create Insights — takeaways or key findings from a study — and keep them organized under the new Insights tab. Create a new Insight from observations or use AI to generate Insights. Each Insight will contain a title, description, and associated observations.

Note that you and your organization will always maintain complete control over any AI engagement. All AI-generated results are editable. Leverage AI as needed for your studies or decide to turn off access completely for your organization.

Surveys Upgrade 📋

We’ll be transforming surveys with enhanced usability, advanced survey logic, and AI integration, empowering you to create, launch, and analyze surveys with ease. Our focus on improving usability will make creating, editing, and launching surveys easier than ever, including new question types, question cloning, question grouping, and AI assistance to streamline survey creation.

Help us build a better Optimal Workshop 🧰

We’re looking for customers to join our research and beta panel to help influence product development. From time to time, you’ll be invited to join us for interviews or surveys, and you’ll be rewarded for your time with a thank-you gift.  


If you’d like to join the team, email product@optimalworkshop.com.

Learn more
1 min read

The Power of Prototype Testing Live Training

If you missed our recent live training on Prototype Testing, don’t worry—we’ve got everything you need right here! You can catch up at your convenience, so grab a cup of tea, put your feet up, and enjoy the show.

In the session, we explored the powerful new features of our Prototype Testing tool, offering a step-by-step guide to setting up, running, and analyzing your tests like a seasoned pro. This tool is a game-changer for your design workflow, helping you identify usability issues and gather real user feedback before committing significant resources to development.


Here’s a quick recap of the highlights:

1. Creating a prototype test from scratch using images

We walked through how to create a prototype test from scratch using static images. This method is perfect for early-stage design concepts, where you want to quickly test user flows without a fully interactive prototype.

2. Preparing your Figma prototype for testing

Figma users, we’ve got you covered! We discussed how to prepare your Figma prototype for the smoothest possible testing experience. From setting up interactions to ensuring proper navigation, these tips ensure participants have an intuitive experience during the test. For more detailed instructions, check out our help article 

3. Seamless Figma prototype imports

One of the standout features of the tool is its seamless integration with Figma. We showed how easy it is to import your designs directly from Figma into Optimal, streamlining the setup process. You can bring your working files straight in, and resync when you need to with one click of a button.

4. Understanding usability metrics and analyzing results

We explored how to analyze the usability metrics, and walked through what the results can indicate on click maps and paths. These visual tools allow you to see exactly how participants navigate your design, making it easier to spot pain points, dead ends, or areas of friction. By understanding user behavior, you can rapidly iterate and refine your prototypes for optimal user experience.

Seeing is believing

Explore our tools and see how Optimal makes gathering insights simple, powerful, and impactful.