As noted, your tree is a text-only version of your app/website structure. Your category labels (first level, second level, and so on) are known as ‘parent nodes’, and your information labels – the bottom leaves of your tree – are known as ‘child nodes’. In this example, ‘Meal options’ and ‘Home meal packs’ are parent nodes and ‘Meals for 2 People’ is a child node.

If you don’t already have access to a sitemap, you can build the tree from the labels and structure of your website. Either way, here are some top tips for getting your tree right.
A tree test will give you data on a specific section of your website. If you want to test your whole website, your first label might say ‘Home’, and the next level labels will represent the links on your homepage:

And if you want to test one particular section of your website instead of everything, your first label will act as your ‘homepage’, and your next level labels will represent the main links on that page.
For example, below we only wanted to test the labels and categories within the ‘Open and apply’ selection. So ‘Open and apply’ would act as your homepage in this instance.

There are two ways you can build your tree in Treejack: create it in a spreadsheet then import it into the tool or build it directly in Treejack.
Creating your tree in a spreadsheet and then importing it to Treejack is a simple way to build the tree you want to test. You may already have access to a spreadsheet sitemap if you’re improving an existing website. Having your tree on a spreadsheet will make testing different versions of the same tree quick and simple. Read more about importing a spreadsheet here.
You can also easily build your tree straight into Treejack. You might find this useful if you’re creating a brand new structure to test, or making small changes to a tree you’ve already built. You can then download a CSV file from Treejack so you have a spreadsheet copy of your tree as well. To retest the same tree, simply duplicate the first test and make any changes in the new study before relaunching.
As noted, if you are improving your tree, we recommend running more than one tree test at a time. The two trees should contain navigation differences that reflect different hunches that you have. How your users respond to each of the trees will give you valuable insights into how any final tree should be structured.
The simplest way to run two tests is to create one test, including all of the introductory questions, tasks, branding and so on, and then duplicate that test, replacing the tree with the second tree that you wish to test. Both tests now have identical tasks and set-ups so you know that you are legitimately testing the differences between the two trees.
There’s an answer for everything
Tree testing assesses how easily people can find information on your tree, so each task you ask participants to complete will need a correct destination. This destination will be a ‘child node’, and will represent the information you want your website visitors to be able to find easily.
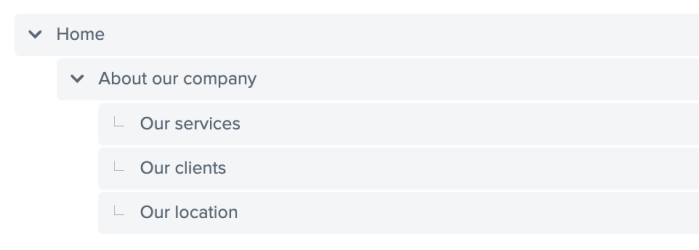
As Dave O’Brien, a key player in creating Treejack points out, “any implicit in-page content should be turned into explicit topics in the tree, so that participants can ‘see’ and select those topics.” For example, you might have a long-scrolling page labeled ‘About our company’ that has three types of information on it – ‘Our services, ‘Our clients’, and ‘Our location’.

If someone visited your actual website to find out where your office is, for example, they’d only need to click ‘About our company’ and scroll the page to see the information they wanted under ‘Our location’.
To test this as a task in Treejack, your tree would have ‘About our company’ as a ‘parent’ node, and the three elements of information as ‘children’. You would then select ‘Our location’ as the correct destination. In setup, it would look like this:
And your participants would see it like this:

They would be able to select ‘Our location’ to complete the task successfully:

Exclude labels like ‘Contact us’ and ‘Search’
You want to test the findability of your information, so exclude labels from your tree that participants might select as an easy way out of finding the actual answer. Labels like ‘Contact us’, ‘Help’, and ‘Search’ are useful options for people when they use your actual website, but if people select these in your test you won’t be able to infer anything from the data.
Getting the labeling and hierarchy of your content right will reduce the need for people to contact you or use the search function, so that’s something to keep in mind as well.
One of the key principles of tree testing is that it removes the navigation design detail from your test. Users don’t know whether, in the live site, the link they are seeing in your tree is twice as big as other links and in bright pink text – or not. This is deliberate. Tree testing is testing the findability of content in your tree based upon the labels and their arrangement in a hierarchy. Later on, you can test the relative attractiveness for clicks of elements in the page using a Chalkmark click test.
One issue we often get asked about is how to reflect the difference between footer links and other links. You have some choices here;